AQUATINT
The “Intaglio” process to create tonal prints is called “Aquatint” from the Latin words “aqua” for water and “tint” for tone. This process produces tone rather than line. In aquatint the plate is covered with a ground that is granular rather than solid then etched in acid. The acid bites around these particles making the metal rough like sandpaper. The amount of time in the acid determines depth, roughness of the surface thus the darkness of the tone. You etch from the lightest tone to the darkest…the rougher, deeper the texture the more ink held and the darker the tone. After each acid dip – you must paint an acid resist ground on any tonal area you wish to save.Traditional aquatint from the time of Goya used rosin – a solid form of pine tree resin that was ground to a fine powder then melted onto the plate surface. Today’s artist can use other products such as enamel spray paint or spray on wax floor polish.Getting the rosin dusted evenly on the plate can be tricky. I used a rosin box. The open top shelf held the plate. After closing the box – I used a hand bellows to blow the rosin dust into the air, 10 minutes later my plate was evenly covered with a coating of rosin dust. Then I heated the plate in the oven (or on a hotplate) until the dust melted clear and adhered to plate. (With a magnifying glass it looks like tiny, tiny dots of clear nail polish.)I dip each plate between 20 to 26 times in the acid bath to get graduated tones. I stop out (paint) areas on the plate I want to protect with an acid resist ground between each acid dip. Each plate can take 3-4 weeks to etch. Last step before printing is to remove all the ground and rosin with solvent and then bevel the sharp plate edges with a file. Otherwise the edge will cut the paper and felt blankets when run through the press.


PRINTING
I used etching ink mixed with a modifier (Easy Wipe, Plate Oil, etc) to the consistency of hand cream then I pushed the ink into the image on the plate with the edge of a cardboard square. Once the plate was covered with ink, I removed the excess from the top surface – first with tarlatan (a stiff cheesecloth like material), then more wiping with Yellow Pages and finally ended with wiping by hand.
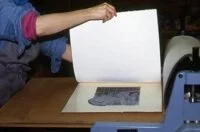
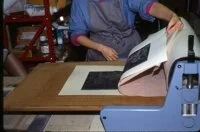
Next I applied a surface color to my plate with a large rubber roller coated with an even layer of silver ink modified with plate oil. I worked the roller back and forth over a thin layer of silver ink on a glass table top until it was evenly coated. Then I rolled over the inked plate with only one pass. Most print papers must be soaked in water to soften before printing, this makes the paper more receptive to the transfer of ink. I soaked my Somerset paper while inking the plate and when ready to print, I blotted the wet paper between white cotton towels. I wanted the paper damp not wet. Then I centered the paper over the plate on the press bed, covered with 3 wool felt blankets of various thickness and turned the press wheel to print.
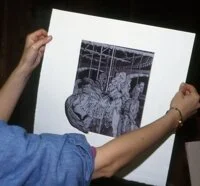
And “Presto” – I had a print. I carefully lifted the printed paper from the plate. Notice the irregular shape of the plate – I used a hand scroll saw to cut the tail shape and various files to bevel the edge for printing